


To help you modify the Cash & Carry window, there is a separate administrator manual that has been specially written for setting up the Cash & Carry window. Additionally, all the settings are explained that can be defined via the system. Furthermore, there are several parameters that need to be modified in collaboration with TSD. Contact your system administrator for this for further assistance. This manual contains references to names of buttons that are defined in the window below.


Once you have defined the settings, you can start using the Cash & Carry window. Depending on the settings, importing the scan batch (a file with the scanned lines) can be done in 4 different ways.
In the next 4 sections all the ways of inputting data will be covered, while the further processing of the scan sales order will be covered in the following Manual.
 Using the keyboard scanner
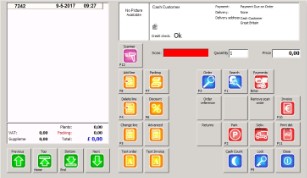
Open the Cash & Carry window via Sales -> Scan sales, if it has not opened automatically. The standard Cash Sales customer is automatically selected. The cursor blinks in the 'Scan' input field. At the same time, the input field is coloured green.
Read the barcode of the article using the keyboard scanner. The barcode is entered in the input field and the article is placed in the list area with the number 1. The cursor now blinks again in the 'Scan' input field (coloured green) and the next item can be scanned.
If the quantity of the sold item is higher than 1, before you scan the item, enter the desired number (maximum of 5 digits) and press the <Tab> key. The quantity will be placed in the 'Quantity' input field. The 'Scan' input field is empty, and coloured green. Now scan the barcode of the article. The article plus the quantity is placed in the scan sales order. After this, the 'Scan' input field is again empty (coloured green), ready for the next article to be input.
Instead of entering a quantity with numbers, you can also scan a barcode that is specially designed for the quantity. After scanning the quantity, the 'Scan' input field will immediately become empty again (coloured green) and the article can be scanned.
Importing scan sales without a day/customer number
Open the Cash & Carry window via Sales -> Scan sales. The Cash Sales customer is automatically selected. The cursor blinks in the 'Scan' input field. At the same time, the input field is coloured green.
Make sure that the scan batch has been sent to the computer in the correct manner. If there is a batch present, the button for reading the scanner will blink.

Click on [Scanner]. The scan batch is read and the articles with quantities are placed in the list area.
Importing scan sales with customer number
This method of scanning is especially useful if the majority of sales are to standard business (including VAT) customers.
Standard business customers have a customer card with a barcode. For customers without such a card, a number of cards with barcodes can be available at the collection centre/garden centre, which can be used as a day pass by the customers. After importing the scan batch, the right customer will have to be linked to the scan sales order.
The customer barcode is defined using the relation info on the "Communication" tab page in the EAN registration code field.
If there is no customer barcode present in the scan batch, or WinTree fails to recognise the customer barcode (for example, because this has not yet been linked to a relation) a clear text in red will appear in the topmost section of the Cash & Carry window, warning that the correct customer will need to be selected. Make sure that the scanners you use have been adapted in such a way that they are able to scan customer barcodes.
After the sold items have been scanned, the scan batch is sent to the computer.
Open the Cash & Carry window via Sales -> Scan sales. The Cash Sales customer is automatically selected. The cursor blinks in the 'Scan' input field. At the same time, the input field is coloured green.
Click on [Scanner]. The scan batch is read and the articles with quantities are placed in the list area. At the same time, the correct customer info is displayed in the window.
Importing scan sales with day/customer number and multiple orders
This method of scanning offers the option of scanning multiple customers one after the other. This is particularly useful if the customers choose the articles and have them scanned and then the administrative processing can take place at a later stage (delivery note and/or invoices are sent later).
To work with this method, the scanners must be able to scan multiple scan sales one after the other (consult your scanner manual)
 Reading a scan batch
After the articles have been scanned, the scan batch is sent to the computer.
Open the Cash & Carry window via Sales -> Scan sales.
The Cash Sales customer is automatically selected. The cursor blinks in the 'Scan' input field. At the same time, the input field is coloured green.
Click on [Scanner].
The Process scan sales window is now opened.
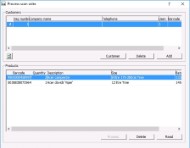
In the top section of this window all the day numbers with the customer data specified from the scan batch can be seen.
If the scanned day number has not yet been linked to a customer, click on [Customer] and select the desired customer in the search window.
Use [Delete] (in between the two list areas) to delete the day number. Note that this can only be done after the scanned sales lines have been removed in the lower section. [Add] is redundant here.
In the lower part of the window, all the sales lines are displayed that have been scanned with that day number, selected in the top part of the window. You can delete lines from here already if needed. Select the line and click on [Delete] (at the bottom of the window).
Select the day number with the customer data that needs to be processed.
Click on [Process] The scanned sales lines with the customer data are placed in the Scan sales window. If a customer has not been linked to a day number, [Process] will not be active. You will first have to link a customer to the day number.
The Process scan sales window will close after the processing has been completed. [Read] only functions if new scans are present in the scanner and the scanner is resting in the cradle.
If multiple day numbers are present in the scan, after the scan sales order has been processed, you must click on [Scanner] again. In the opened 'Process scan sales' window, select the day number that needs to be processed and click on [Process].